Home · Windows 10 · Narrative Text · Other

HOW TO CHANGE YOUR PROCESSOR NAME – It’s just for fun

HOW TO CHANGE YOUR PROCESSOR NAME


How to Change your Processor Name – It’s just for fun


Hello guys, I’m so starving and worn out at the same time. I need some food here, do you have any?  Maybe one of you are sincerely to give me some. Hahahaaa… I just teasing you. OK, today I want to share with you about changing your Processor name. Have you ever felt so sad because your PC’s specification is not good or high especially your PC’s processor? I will tell you how to change your processor name, so you don’t need to be sad because of it. How can we do it? Yes. It’s possible. We will edit the registry in your Windows. But, it’s just for fun only, don’t you have high expectation just the way you want it. Hahahaaa..

You may also like this : How to Enable Bash Ubuntu on Windows 10

OK guys, Let’s get started.

First, open up Registry Editor by pressing Win Key + R, then you type “regedit”


Then, you have to choose HKEY_LOCAL_MACHINE > HARDWARE > DESCRIPTION > System > CentralProcessor > 0, then at the right window, we look up the string of which name is ProcessorNameString.


Then, click on that string and you can change the name of your processor as like as you want. After that, you can click on “Next”.


You’re all set. Now, you can check your processor name by right-clicking on the Start button, and choose “System”, and you can see the different guys. Don’t expect too high, It’s just a name. Now, you can deceive your friends. Hahahaaa…


You may also like this : How to Remove Files in Recycle Bin with one click


Thanks


Related Posts:

HOW TO CLEAN INSTALL WINDOWS 10 USING DVD

HOW TO CLEAN INSTALL WINDOWS 10 USING DVD


HOW TO CLEAN INSTALL WINDOWS 10 USING DVD

Ohooww.. Welcome back guys!!! Have you ever experienced with a problem just like BSoD, malware attack, or bugs which drive you mad ? There are some ways to fix it, you can restore your system by using System Restore to go back before the problem occurred, and using system image. But, if you want to have your PC fresher, you can clean install your PC. I prefer to do this if I get any problem which probably can’t be fixed well to use System Restore feature or System Image.

You may also like this : How to Fix Problem by Using System Restore on Windows 10

OK. Today I want to tell you how to clean install your PC. Let’s get started guyss.

First, you have to have an ISO file of Windows 10. You can download it in trusted web, just like Microsoft web, Tech Bench, or else. I hope the speed of you internet connection is stable and fast, because the size of the ISO is about 3 GB for x64 based and 2 GB for x86 based. If you have had it, you can skip this step.

NB : If you have 2 GB of RAM installed in your PC, I suggest you to choose x86 based. But, It depends on your processor, if your processor supports x64, you don’t need to be afraid to use x64 or x86. For making sure whether your processor supports for x64 based, you can check it by using “Securable” app. It’s a portable app, you don’t need to install to your PC, just run it.

Then, you have to create a DVD bootable. Actually, the bootable is also able to created by using Flash Drive. If you don’t know how to do it, you can search it to Google Search. It’s a piece of cake. You can use PowerISO, UltraISO, CDBurnerXP or Daemon tools app. All of them are good to use and user-friendly. In this step, I assume you have created it.

You have to boot your PC to BIOS. We will change thr first boot of your PC from Hard drive to DVD. You can access it by pressing a key on your keyboard. For your information, each of the notebook’s vendor has its own key to access it. For example, my notebook is AS*S, I can get access to BIOS by pressing “Delete” button. You can search it by yourself. I assume you can access it. In this step, you have to navigate to Boot tab, and adjust the first boot to DVD and the second boot to your Harddrive. Then, you can save changes and exit.


If It’s been shown “Press any key to boot from CD or DVD”, you can press any key of your keyboard. I’m used to pressing “Enter” button.


In this step, you don’t need to change anything, just click on “Next” and then, click on “Install Now


If you have a product key, you can type it to the box, if not, you just click on “I don’t have a product key” and input it later.


You have to choose whether you want to install Windows 10 Pro or Windows 10 Home Edition. Then, click on “Next”. Uppsss.. I want to tell you that the version of ISO file we use in this tutorial is Multiple Edition.

What is Multiple Edition?

Multiple Edition of ISO file allows you to install whether you want to install Pro or Home Edition. Both of them are available to install. But, you can’t use both of them, you can only use one of them either Pro or Home Edition. The advantage for us to use Multiple Edition is we don’t need to download both of that versions. We just download it and get two editions in one ISO file and you can save your Harddrive space. The Multiple Edition is not “preying” your harddrive too much than downloading two ISOs one by one.


Check on “I accept the license terms” and click on “Next”


In this step, you have to choose “Custom: Install Windows Only (advanced)


You have to figure this out well. Put your pointer to the partition of your previous Windows installed of which type is “Primary”. It's necessary to memorize each partition in order to get away from loss existing data. Then, click on “Format” and click on “Next“ to install your Windows 10.


Your Windows 10 will be being installed. Wait for it about 25-30 mins. If  your Windows 10 installation process has completed, your PC will be restarting for a few times. Don’t worry, your PC is not in trouble. It’s part of this installation. Calm down.


After restarting, your PC will be prepared so It’ll get ready to use. But, It takes ages(maybe) Hahahahaaa…..


If you’re in network area, just like Wi-Fi, Ethernet, etc, you can connect your PC to the network connection ( If that is needed and required ).


You will find this step. just click on “Use express settings” or click on “Costumize settings”  to set up your PC manually, then you have to wait for it again. It’ll download updates for your Windows 10 and making it get ready to use. (Calm down guyss, It doesn’t take ages, just smile…).


You may also like this : How to Change Default Boot on Windows

In this step, you just choose “I own it” and click on “Next”. You have to wait for it again guys..


After waiting for a while, you can find this. If you want to use Microsoft services or features just like OneDrive, Cortana, Store or XBOX, you have to login using Microsoft Account (It’s optional), if you want to do it later, you can click on “Skip this step” at the left-buttom corner. If you have had a Microsoft Account, you can input it, and click on “Sign in”. In our tutorial, I choose “Skip this step”.


In this step, you can create an local account for your PC including the password. You can also switch your local account to Microsoft account on Settings > Privacy. Password for your local account is optional. Then, click on “Next”. After this, you have to wait for it again about 5 mins. Hahahaaa… Don’t worry guys, It’s the last step. Calm down.


You’re all set. This is your desktop.


You may also like this : How to Dual Boot Windows 7 with Windows 10 


Thanks


Related Posts:

HOW TO ENABLE BASH UBUNTU ON WINDOWS 10

HOW TO ENABLE BASH UBUNTU ON WINDOWS 10


HOW TO ENABLE BASH UBUNTU ON WINDOWS 10


Hello guys, welcome back!!! How are you? I hope you are good today. Uhh!!! I have been busy and now I have time to create this article for you. Today, I want to tell you how to enable and run Bash Ubuntu on Windows 10.

What is Bash?

Bash is a new feature which firstly has been embedded in Windows 10 Insider Preview Build 14316. Integration between Ubuntu UserMode and Linux Tools can be run natively on Windows 10.

Let’s check this out guyss

NB: Your PC must be running on Windows 10 Insider Preview 14316 or later. Bash Ubuntu is only able to be run on x64 based operating system. So, for you who are still running on x86 based operating system and want to use Bash, you have to clean install your Windows to x64 based. If you don’t know how to do it, you can visit How to Clean Install Windows 10 .

First, you can put your pointer to Search box, then type and open ”Settings”, then click on Update&Security > For Developers, then you have to switch “Sideload apps” to “Developer Mode


Next, you have to enable “Windows Subsystem for Linux (Beta)” by right-clicking on Start button, and open “Program and Features” at the top.


Then, you have to click Turn Windows Features On or Off” at the top-left side


Next, you have to enable Windows Subsystem for Linux (Beta)” by checking it and click “OK”. Wait a minute while searching required files.


Then there will be a dialog for you to restart your PC to enable this feature. Just click “Restart now” or “Don’t restart” ( if you want to do it later ).


After restarting your PC, you have to open Command Prompt and run it as administrator. Then, type “Bash” or you can type it at the search box. After that, if you want to continue, you just type “y” and enter. Bash will be downloaded and extracted automatically.

Via Command Prompt


or


Via Search Box


If It’s all set, you can find an app in Start menu, that is “Bash on Ubuntu on Windows” or in Search Box by typing “Ubuntu”. Now, you can use it as like as you want.


You may also like this : HOW TO DUAL BOOT WINDOWS 7 AND WINDOWS 10


Thanks


Related Posts:

HOW TO DUAL BOOT WINDOWS 7 AND WINDOWS 10

How to Dual Boot Windows 7 and WIndows 10

HOW TO DUAL BOOT WINDOWS 7 AND WINDOWS 10

Hi guys, How are you today? Today, I want to tell you how to dual boot Windows 7 with Windows 10. As I said at earlier article that the purpose to dual boot your PC with Windows 10 just because you want to try the newest build of Windows 10 out while still running on Windows 7 and to know more about the new features that have been embedded in Windows 10. That’s why, I want to share this with you. OK. Let’s get started. 


First, you have to create new partition you need for your Windows 10. Press Win Key + R, then type “diskmgmt.msc” (without quote). Then, put your pointer to the drive of which space is still enough. In this case, I want to use Local Disk C. Then, right-click on it, and choose “shrink volume…


            Adjust how much space you need for Windows 10. After that, click on “Shrink”

NB: the minimum disk space to install Windows 10 is 16 GB, so you need 16 GB or more than that.


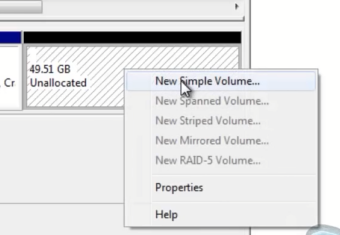
       There will be an “Unallocatted” drive, then right-click on it, and choose “New Simple Volume…”. There will be a wizard, then click “Next”, “Next”, “Next”, and “Next”, the last is to click “Finish”.


         You have to download the ISO file of Windows 10. You can download it wherever you want, but I strongly recommend you to download it on Microsoft Website, using Media creation tool app, or download it in trusted web. If you have had it, you can ignore this step. But don’t ignore me guys…

        You can create ISO bootable using DVD or USB Flashdrive. If you want to know how to create it, you can search it by yourself on Google Search. It’s a piece of cake, you can create it by using PowerISO, UltraISO, or Daemon Tools. (My principle is to look for anything by yourself, thus you can figure it out well. Hahahaaa…. ).

          Then, you have to restart your PC and boot to BIOS to adjust the first boot of your PC. You can access it by pressing a key of your keyboard. Every vendor has its own key to boot to BIOS. For example, my notebook is AS*S, the key to access BIOS is “delete” button. I assume you have been able to access BIOS. In this tutorial , we use DVD bootable, then you have to navigate to Boot tab, and change the boot option #1 to DVD and the boot option #2 to Harddrive. Then, save changes and exit.


          If this sentence has come out “Press any key to boot from CD or DVD….”, you can press whatever button you want as quick as possible. If you’re late, your PC will be restarting as usual.


              If this menu has been appeared, you have to click on “Next”, then just click on “Install Now”.


          Then, just click on “I don’t have a product key” if you haven’t had an original product key yet, If you have it, you can input it to the box.


          Then, you can choose what version you want to instal either Windows 10 Pro or Home. But, It’s all based where you downloaded it. The version that we are talking now is Multiple Edition. Then, click on “Next”.


              Check “I accept the license terms” and click on “Next”


             If It’s been appeared, you have to choose “Custom: Install  Windows Only (advanced)


                You have to figure this out. Put your pointer to the partition that we have created. Then, click on “Next“


              Now, your Windows 10 is being installed. Just wait for it about 30 mins. If  your Windows 10 installation process has done, your PC will be restarting for a few times. Don’t worry, your PC is OK, It’s part of this installation.


            After restarting, the boot menu will appear, so in this step, you have to click on “Windows 10”, then wait for it about 15 mins until the your PC get ready to use.


                 Then, It’ll be shown again and just click on “Windows 10


               If you’re in network area, you can connect your PC to internet connection just like Wi-Fi, Ethernet, etc ( if that is needed and shown ).

             After that, you will find this step. You can simply click on “Use express settings” and you have to wait for it again. It’ll download updates for your Windows 10 and making it get ready to use. (Calm down guyss, everything needs processing, just smile…).


               This will be appeared, you can choose “I own it” and click “Next”. You have to wait for it guys.


             After waiting for a while, you can find this. If you want to use Modern Apps, you have to login using Microsoft Account (It’s optional), if you want to do it later, you can click on “Skip this step” at the left-buttom corner. If you have had a Microsoft Account, you can input it, and click on “Sign in”. In our tutorial, I choose “Skip this step”.


            In this step, you can create an account for your PC including the password. But, password is optional. Then, click on “Next”. After this, you have to wait for it again about 5 mins. Hahahaaa… Don’t worry guys, It’s the last step. Calm down.


           This is your desktop. You’re all set. If you keep an eye while reading this tutorial, you’ll successfully dual booting your PC with Windows 10.


You may also like this : How to Enable Slide to Shutdown on Windows 10


Thanks


Related Posts: